Thursday 17 April 2014

Macrame button loop clasp tutorial

I've been enjoying doing a bit more knotting recently. I am a little bit fickle when it comes to jewellery-making techniques - I get really obsessed with one thing, then abandon it for the next when something else captures my imagination. I used to knot *everything* and didn't use beading wire at all, but for the past year I've mainly used nylon-covered stainless steel wire. Now I'm back on the cord! I've not abandoned the beading wire though, I'm just enjoying the tactile and 'hands on' qualities of the Irish waxed linen cord. 

I've always been a little unhappy with linen cord loops, worrying that they weren't quite sturdy enough, even covered with beads, to really work as a clasp. A few days ago I had a brainwave whilst making a knotted bracelet - I had two really long tails left, and I came up with the idea of half-hitching one cord onto another to see what would happen. I am sure that many, many people have done this before me, and I'm certainly not claiming this as my own - but it was definitely a lightbulb moment for me! I thought I'd share what I did with you here. 

1. Finish knotting the main part of your bracelet, ending with two loooong cord ends. If you like, you can leave one much longer than the other so as not to waste too much. You do need a lot of cord to knot with for this! I'm not a measurer, but you may want to work out exactly how much cord you'll need after you've made a couple. My brain just doesn't work like that! 

2. Bring one cord (the working cord) over the other to make a u-shaped loop. 

3. Bring the working cord back through the loop. 

4. Pull snug to form a half-hitch knot. 

5. Repeat these half-hitch knots, using the same working cord, to form this spiralling rope. 

6. Tie the working cord around the base of the rope to form a loop. I tie a double knot and then added a few beads to the tails, crimping them on. 

7. Here's the finished bracelet! And another one with different cord/beads below:


Art beads from - www.mamacitabeadworks.etsy.com
www.helenjewellery.etsy.com
www.grubbi.etsy.com

Pressed glass, 7ply Irish waxed linen cord and Vintaj brass crimps from - 

www.thecuriousbeadshop.etsy.com. 


Wednesday 16 April 2014

Happy Birthday to Me!

Yep, today - 16th April - is my birthday! And I'm having a wee celebration. I hope you will join me! I'm throwing a birthday party in my etsy shop, where you can take 33% off all day today - but just for today. Coupon code BIRTHDAY33. Can you guess how old I am?

Here are a few of the lovelies on offer. Coupon code not valid on custom orders or any extra custom work on pieces already available apart from simple re-legthening, but hopefully there is something for you already in the shop. Take a peek!


Have a great day - and raise a glass to me this evening! 

Friday 11 April 2014

New beads...

After a few rather wordy posts from me, I thought you might prefer a more picture-heavy one.....featuring some of the lovely things that have arrived with me recently and will shortly be turned into unique art jewellery (although I reserve the right to hoard. I really do). 
Wonderful handmade beads from Flowerjasper Lampwork Glass. Are these not just the most perfect shade of blue?

Fabulous chunky resin nuggets I snagged in a destash. Chunky and organic, but light because they are resin. Loving these a lot!

A whole lot of love from Swoondimples.....

Sweet tweets from Jettabug Jewelry. Her work is so folky and whimsical - perfect for my jewellery. 

Belfast is not overrun with bead shops.....in fact, Curious makes up 50% of those of which I know about! However, it does have a nice general craft shop which I visited for the first time a couple of weeks ago. As is often the case with more general craft shops, the bead selection leans toward the cheap and cheerful, but I was rather taken with these pretty pacific opal nailheads. Lovely colour and I have a bit of a thing for nailhead beads. 

Last but definitely not least, some tiny tassels, again from Swoondimples. I bought these partly because who doesn't love a wee tassel? But also because they remind me of one of my current favourite songs. I'm trying to hunt down a print with the title quote on it for my studio 'Follow your arrow wherever it points' - haven't found quite the right one yet, but I'm on the look out! I must confess I do like the odd bit of folky country music. 


Wednesday 9 April 2014

At Last! Basic knotting with waxed linen cord tutorial

If I had a pound for every time someone has asked me if I have written or know of any tutorials on knotting with waxed linen cord, I would be a rich woman. 

Every time, I have replied with the response that no, I'm sorry, but I don't know of one/haven't written one, but that I have grand plans to write one! I had some super-grand plans to make a video tutorial for it - and I may do in the future, you never know - but the only way I could think of doing so was to hold my iPhone with my teeth, and I'm not sure I would be able to focus the camera terribly well on what I was doing.....

I must apologise to all the many people I assured I would get a tutorial written that week/month when they asked! It is a really tricky thing to show in photos. However, I decided that a photo tute would be better than no tute, and so....Ta-Da! Here is is! (Please excuse the chipped turquoise nail-varnish by the way....!)

In this tutorial I am using Plum 4ply cord which you can pick up over at The Curious Bead Shop. I would recommend starting out with 4ply - it's a good diameter and comes in a lovely selection of colours. (My personal preference is for 7ply {thicker} when possible, but I use a lot of 4ply too.)

**Please note: this tutorial details how I personally like to knot. Other people like to hold things a little differently, use knotting tweezers or knotting tools and that's what works for them. I've been knotting with silk, linen and cotton for years and this is the way that works for me - I know it works, and I know it works ergonomically, and so I am sharing this way of knotting with you, the only way I can endorse from my own personal experience of knotting. Don't be afraid to experiment beyond this tute however!**


1. Ok, I'm going to start you off just knotting. Not necessarily making a piece of jewellery. I TOTALLY recommend practicing with some spare cord first, to get the hang of placing the knots. Although I am going to show you how I personally do it, I know from experience that we're all different and you may find it easier to hold things a little different to me, to create tension in slightly different ways.....you won't know until you do a bit of knotting yourself, and practicing is a good way of doing it, without the pressure of creating a piece of finished jewellery. So....

Tie an overhand knot. 


2. Slide a bead onto the cord, right up to the knot created in 1. Then tie another *loose* overhand knot. You need it to be loose for the minute as you're going to want to take your time tying it so that you can place it precisely - snug against the bead.


3. Position what I call the 'nub of the knot' right against the bead. You can see the loop of the knot is still loose though. You want to gradually shrink this loop...


4.....making it smaller and smaller (you can see I'm using my finger and thumb to push the loop against or into the bead - I only do this when the loop gets pretty tiny)....


5.....until you have two knots, each one snug against the bead.


6. Slide another bead on and repeat the knotting process. You can see here that I am keeping the nub of the knot tight against the bead by creating tension in the loop using my fingers. (I'm right-handed by the way, so this is my non-dominant hand at work here). This is a personal thing - nobody taught me, but it works for me. 


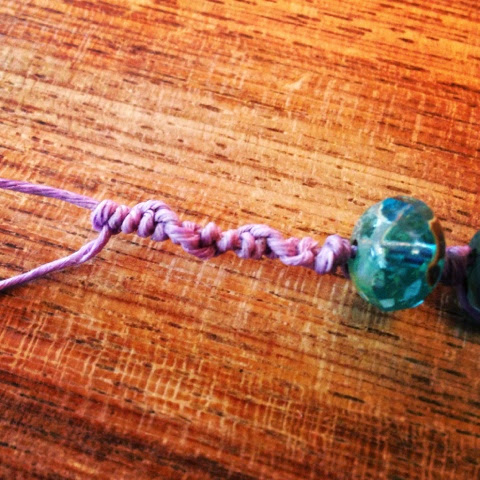
7. Here you have two beads knotted side by side, nice and snug. Exactly what you're aiming for. (Excuse the tea stain on my speckledy surface - you don't notice these things til you photograph them sometimes!)


8. Ok, so once you've got the knotting bit down - and it will take a bit of practice for most people, it did for me - then here's a nifty way to start a piece of jewellery with waxed linen cord. Fold the cord over on itself and pass through either a jump ring, or the loop of a toggle clasp such as the heart above. 


9. Pass the two tails back through the loop you created, like you would with a gift tag. This is a lark's head knot by the way - there are loads of easy to follow tutorials on YouTube if you are in any doubt. (Note: I have moved the cord OUT of the small loop here so you can see what's going on better in the photo. DON'T do that when you are trying this at home! Keep the cord passed through the small loop.)


10. Pull snug, and there you have a good starting point for your necklace/bracelet! As you've got a double length, you have the choice of a double-strand bracelet, using both lengths of cord at once, or working with one and hiding/decorating the second one as a tail. 


11. Here, I've started off knotting with both lengths of cord, using slightly larger-than-average holed beads. 


12. And here's how to do those decorative tails. Slide a bead or two on the tail, knot to secure that bead, and you're done. Easy, secure and pretty. 


There are so, so many ways of knotting with different sized cord/beads, different numbers of cord going through each bead, different numbers of strands etc.....hopefully, if you've not known where to start with waxed linen cord, this will give you a wee helping hand. Leave any questions for me in the comments! 

Monday 7 April 2014

When to copy and when not to copy - my own thoughts - part 1


Copying. 


What a very, very loaded word it is. 

I am not the first designer to write about this subject and I certainly won't be the last. I bet if you are reading this, you already have your own thoughts on the subject, and they may well differ from mine - it's a subjective and hugely emotive topic.

Firstly, I want to start off with a positive. Because copying can be extremely positive. It can be vitally positive. It's how we learn - it's how we teach. 

"Watch what I do carefully, then try yourself."
  We repeat, trying to get as close to the original version as possible. 

If you are reading this and you are a beader/crafter/human, no doubt this will be something you are familiar with. Think of a wee one, learning to talk, walk, write.....it all starts with copying. Copying is GOOD.

I'm coming at this subject from a different angle from some of you, no doubt. I started playing the piano at seven, the 'cello at eight.....I joined my first choir at six......the skills are learnt through copying and repeating  - practicing - to perfect. I copied the technical aspects of the skills my teachers were passing on to me, and I played and sang music often 100s of years old; music that 1000s of people had played and sang before me, and will do after me. Not copying, but reproducing the music that composers have slaved over - creating, scrawling it out note for note, pouring time and effort and years of experience into the music - so that I can reproduce - reawaken - this piece of music years later, in a practice room in a school in Edinburgh in the 90s, where I can be frustrated and bored and satisfied by repeating and repeating and repeating.....getting my version of whatever piece of musical art I am attempting to hone my craft through the perfection of. 

My story is not unusual - every musician; dare I say every artist and crafts-person, professional and amateur, has learned a lot through copying. They have learned and honed and perfected the techniques of what they do, and a great part of that learning experience is copying. 

Of course copying is only the beginning. As you learn and progress and listen and think, you start to develop your own voice - literally, in the case of music. Your own take on your art; your own version of these old masters. You learn a way or ways to interpret whatever piece of music is put in front of you. You are of course influenced by other musicians, other artists - by music and sound and art all around you - but ultimately, the musical versions that leave your instrument are yours. And the more authentically 'you' your versions can be, the more interesting, true, potentially beautiful your playing can be. 

In jewellery terms, how does this translate.....? It depends. Music is of course different in that I am 'reproducing' a piece composed by another. Music is also different in that if it is not performed, played - brought to life by others, it all but ceases to exist. And if you've ever been to a live concert you'll know that, great as recordings are, nothing beats a LIVE performance, whatever genre(s) of music you favour. You have to recreate music again, and again, and again to keep it breathing - to keep it alive. (And if I want to do that in public by the way, if the music is in copyright I have to pay for those rights. Buying the sheet music does not cover this.)

Back to jewellery.....and how I am extending the metaphor here...If you want to make jewellery for YOU, and to give to loved ones, and are happy recreating others' designs, then perhaps you don't have to worry about this too much. There is nothing wrong with that. NOTHING.

I occasionally do cross-stitch (I'm talking very occasionally here!) and I am perfectly happy to buy wee kits and stick to patterns and other people's designs. That's part of what I like about it. I can switch that part of my brain off. I have no plans to do any cross-stitch designing anytime ever. I am quite content with this, and if this sounds like you, then that is fine and wonderful too. I make the odd bookmark to keep for myself, or possibly to give to my Mum. (Lucky Mum!). I would never sell any of the very few things I make. I love that through patterns/tutorials/kits, I can own a little piece of someone else's art - not only that, but have the fun of making it for myself. 

But say you find that you want to start designing for yourself, that you want to move on from the copying - rinse - repeat stage. It may start with something as simple as making your own colour choices....you may want it to end with you running your own part-time, full-time business......It's like loving to read and through that discovering that you want to write.

Step one. Hone your techniques. This (for me) doesn't just mean practicing wrapped loops and crimping, tension and finishing, soldering, piercing and polishing....it means learning how colours, textures, weighting works within jewellery. Figuring out what lengths and styles work. Learning about materials and metals and their properties, how to seal and finish and present the final pieces. Looking at what other artists do; asking yourself why? Asking yourself what you like/don't like about certain pieces - what works, what doesn't and why. Look beyond your chosen medium - look beyond decorative arts. Look to fine art, music, literature, architecture, nature....LOOK. If you start with this kind of copying - this analytical 'copying', you will find that out of this base, something starts to creep forth. That something will be your own artistic voice. 

Then turn from copying to being inspired by....and that's a whole other blog post, my friends, I'm pretty sure! A copy is a copy, inspiration is not the same (to quote one of my favourite bloggers/artists over at Rosy Revolver:


"Inspiration" is not a synonym for imitation.
It is not synonymous with simulation.
Inspiration is the seed from which art stems.
The seed, people.
Flowers do not grow from flowers.


Flowers do not grow from flowers.

How do we turn others' flowers into our own seeds?....hhmmm....yeah, that'll be in my part 2....along with other secrets of the universe.....


I'm making this sound quite serious, and maybe that's because I am truly serious about the arts. But serious doesn't have to mean solemn and definitely doesn't mean it's NOT fun! It doesn't mean you can't or don't love what you do. I get joy from copying a pattern - from reproducing something well and being able to appreciate and see and hold someone else's beautifully designed object. A tasty dish from a recipe book. A pretty piece of stitch work. It's just a whole other kind of joy.


But how much more joy do I personally get from not only making, but designing also? A deeper joy, that's for sure. It is much harder work to achieve, I think. But the end result.....looking at something and feeling - that is a physical expression of a part of me, of part of my mind and heart and soul. It's the combination of that alongside what you have learned through copying - repeating, honing, practicing, perfecting......that can result in a beautifully finished piece of handmade art. 


Rebecca is a Scottish jewellery designer, currently living in Belfast, Northern Ireland. You can read more about her and her work at her blog, songbeads.blogspot.com and see more of her jewellery at songbead.etsy.com. She also has a supplies shop at thecuriousbeadshop.etsy.com.


LinkWithin

Related Posts with Thumbnails