I've been enjoying doing a bit more knotting recently. I am a little bit fickle when it comes to jewellery-making techniques - I get really obsessed with one thing, then abandon it for the next when something else captures my imagination. I used to knot *everything* and didn't use beading wire at all, but for the past year I've mainly used nylon-covered stainless steel wire. Now I'm back on the cord! I've not abandoned the beading wire though, I'm just enjoying the tactile and 'hands on' qualities of the Irish waxed linen cord.
I've always been a little unhappy with linen cord loops, worrying that they weren't quite sturdy enough, even covered with beads, to really work as a clasp. A few days ago I had a brainwave whilst making a knotted bracelet - I had two really long tails left, and I came up with the idea of half-hitching one cord onto another to see what would happen. I am sure that many, many people have done this before me, and I'm certainly not claiming this as my own - but it was definitely a lightbulb moment for me! I thought I'd share what I did with you here.

1. Finish knotting the main part of your bracelet, ending with two loooong cord ends. If you like, you can leave one much longer than the other so as not to waste too much. You do need a lot of cord to knot with for this! I'm not a measurer, but you may want to work out exactly how much cord you'll need after you've made a couple. My brain just doesn't work like that!

2. Bring one cord (the working cord) over the other to make a u-shaped loop.

3. Bring the working cord back through the loop.

4. Pull snug to form a half-hitch knot.
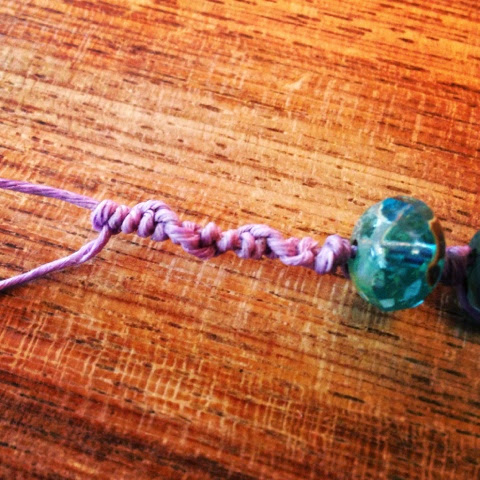
5. Repeat these half-hitch knots, using the same working cord, to form this spiralling rope.

6. Tie the working cord around the base of the rope to form a loop. I tie a double knot and then added a few beads to the tails, crimping them on.

7. Here's the finished bracelet! And another one with different cord/beads below:

www.helenjewellery.etsy.com
www.grubbi.etsy.com
Pressed glass, 7ply Irish waxed linen cord and Vintaj brass crimps from -
www.thecuriousbeadshop.etsy.com.

6 comments:
What an excellent idea! I've been stumped on this too, and so glad you shared your inspiration! Thank U!
Great tutorial Rebecca! I'm sooooo going to give this a go, thanks for sharing :) xx
Brilliant tutorial really easy to understand im deffo going to try it when I get my new beads from Curious :D Thanks for sharing this! x
What a great idea - thanks for sharing your instructions!
Yep, this makes it look great! Really nice tutorial, too!!
I love the linen also! This is great! Thank you!
Post a Comment